
What’s not to love about taking a respite from the urban hustle without having to say goodbye to those creature comforts that you’ve grown accustomed to? Whether you’re looking for a backyard studio, guesthouse, or a vacation retreat, the portability and versatility of a DIY dome building system may be just what you’re looking for when you need a getaway.
The ancient science behind the energetic qualities of domes dates back thousands of years. Once you’ve experienced the Zen-like ambiance of a dome, you’ll wonder why you didn’t discover this sooner – and, some Nature lovers might just be tempted to switch to a more permanent lifestyle.
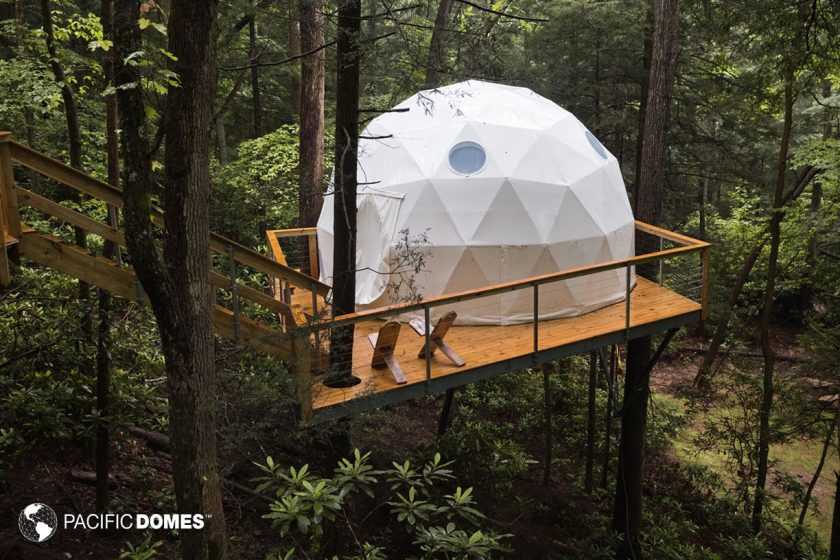
Ecoliving domes appeal to a wide genre of individuals, including unconventional, modern-day digital nomads who are opting for the freedom lifestyle – it’s all about simplifying your life and embracing a closeness with Nature in the great outdoors.
Getting Started… What’s Your First Step
Sorting out building plans, zoning and building permits can seem daunting – but, don’t let that stop you from forging ahead with your dream. Just like any well-planned journey, there’s always lots to consider in mapping out the details; however, wide-open opportunities await those who dive right in and brave the first step, following where their heart leads them.
Why Build a DIY Dome?
Did you know that as a property owner, you can act as your own general contractor and hire sub-contractors or skilled labor to fill-in where you might need some construction expertise? Keep reading – more about that coming up.
First, you’ll want to ask yourself if taking on a DIY project is right for you. Prefab DIY kits come with easy to follow instructions and are simple enough for the average person to assemble – even if you’ve never built anything before!
It’s worth noting that domes fall in the alt-housing category. They are considered temporary structures, which means that you may be able to bypass local zoning and building permits in some areas.
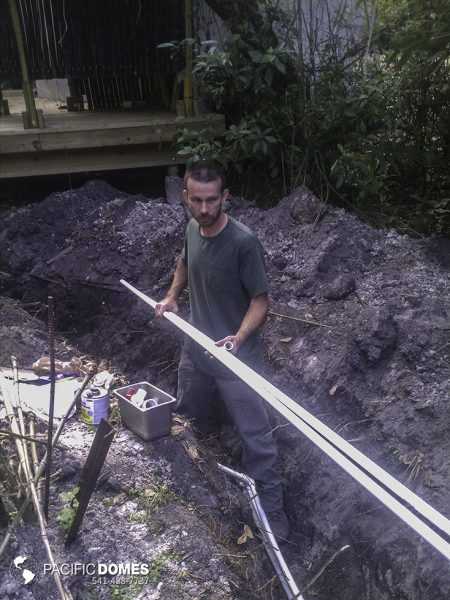
Dome Dweller, Scott Black, lays plumbing for his Tiny Home Dome
What are the pros and cons of taking on a DIY project vs. hiring a pro? The prospect of saving thousands of dollars can make a huge difference between hiring a contractor or going the route of owner builder.
Just to get started, here’s some questions you might want to ask yourself…
- What’s my budget and time-frame?
- If I decide to act as owner-builder, will I pay by the hour for skilled labor or am I prepared to provide an agreement to sub-contractors – or, both?
- Am I willing to source materials, research, negotiate prices and delivery?
- Will I be available to run errands and do most or all of the grunt work? How about disposing of construction waste?
Crystallizing Your dream
Next, you’ll want to sit down with pen and paper to visualize the scope of your project and all the necessary steps from its inception to its completion. The internet is rich with visualization techniques You’d be surprised at how the “Magic of Thinking Big” will unlock keys to your imagination, sprouting innovative ideas, boosting you confidence to create a roadmap that you can turn into reality.
Purchasing Land
If you haven’t already purchased land, here’s some useful tips to help you on your buying journey…
- Try doing an online search for land that you find compelling and looks like a good fit for your project. For added inspiration, be open to taking a look at similar dome construction projects that others have successfully completed.
- It pays to do a bit of investigative research by digging deeper into the little details. Example: locating utilities – are permits needed for sewer, utilities, road access or improvement?
- Zoning laws and restrictions – What types of buildings are allowed. Is there a size and height? Remember, domes are considered temporary structures.
- Try speaking to a real estate agent who specializes in land plots and getaways – they can be helpful when it comes to understanding the locale, zoning laws, building restrictions and can eliminate a lot of the risks involved in the process.
- There are a lot of misconceptions about what land is worth – appraisals aren’t always accurate and negotiation is key.
- Tour the land on foot and explore access and site building – you want your project to be sustainable. Will you have to clear any of the native landscape to create access? Will your DIY building project affect the local wildlife – are there any endangered species that would stand in the way of your developing the land?
- You’ll want to research, gather and prepare all the proper documents. Verbal agreements don’t hold water in today’s business world – once you’re satisfied that the land meets your expectations you’ll want to create a written proposal.
- You’ll want to include the land price, its location or parcel number; and, most importantly, leave room for any contingencies (unforeseen events or circumstances). Contingencies are meant to protect you in the event that an inspection uncovers something unsatisfactory. You’ll be able to back out of the deal and get your deposit or earnest money back. Earnest money is typically a small amount of money that goes into an escrow account to show you’re a serious buyer. If you walk away from the deal for any reason not listed under the contingencies the seller gets to keep the deposit. Most common contingencies for land purchase agreements are :
- Can the land pass environmental tests, meet zoning regulations specific to your project, septic permits and an up-to-date survey that shows the correct boundaries and parcel size, as well as, any possible easements or encroachments. If you aren’t using a real estate agent, be sure to do your research and read over all document carefully.
- Be sure to do a title search for any liens that may be on the property. This might be an out-of-pocket cost of roughly $100 – well worth your peace of mind. A title search can also determine whether there are any special assessments, restrictions or easements on the property. Sometimes, a third party can have a right to use part of the property. This third party could be a neighbor who has access to his property from yours or a utility company that has the right to install poles and do maintenance for power lines.
Decision time
Last but not least, is the moment you’ve been waiting for… the closing. Your offer has been accepted and you’ve received the green light – you’ll want to close the deal by delivering a cashier’s check, so you can receive the deed to the property. You can close with a title company – recommended. Or, another option is to close at the county recorder’s office where your deed will be recorded.
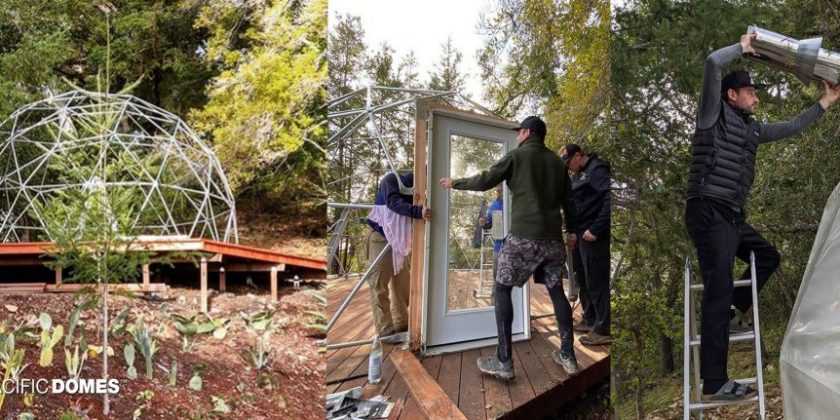
Building Process
Now that you are the proud owner, you can’t wait to get started on your DIY building project. As an owner-builder, you may have to decide upon hiring a sub-contractor at some point along your journey to complete phases of the project that you cannot or choose not to handle yourself – if nothing else, for peace of mind.
Wondering about the why and how of hiring a sub-contractor? You’ll want to hire a subcontractor for mechanical, electrical, plumbing, underground utilities, carpentry or decking – in other words, the scopes which require the most specialized time and attention. A sub-contractor is specialized and more likely will save you money over hiring a crew.
Hiring subs shouldn’t have to be a confusing experience. It’s about the working relationship.
Depending on the scale and complexity of your project there will be plenty of opportunities for you to step-in and supply materials or help with grunt work in order to move the project seamlessly along.
That said, be prepared to stay on top of what’s going on, spending a few extra hours before and after a worker’s day begins and ends, tackling menial tasks that allows them to come in and hit the ground running. Expect delays due to bad weather, changes to the plan, late deliveries, and no-shows and jobsite related unforeens – be aware that constructions sites can be safe or hazardous depending on pre-planning and using good judgment.
Steps to finding, hiring and working with a Sub-Contractor
The whole purpose of hiring and working with a sub-contractor is to rely on their knowledge and expertise. When someone specializes, they’ve typically been through a 3-4 year apprenticeship program and worked in their specialized field for a few years.
Subs can get the job done faster and are better equipped handle any situations that may come up. On the other hand, they can be a big time-drain if you, as the owner-builder, don’t have a clear description of the scope of your work, construction plans with written specifications.
Let your sub-contractor know up front, that you expect communication each step-of-the-way. Consider using daily reporting software and building daily reports right into your subcontractor agreements.
Finding Good Sub-contractors
Good subs are found by asking around and talking to friends and neighbors. See who’s working in your neighborhood. Inquire at your local building supply, lumber yard or hardware store.
Try to get a few names and create a list of subs you’d consider working with. It’s wise to solicit more than one bid.
You’ll find that if you’ve done your due diligence and clearly defined construction plans, a good subcontractor will only need minimal supervision. It’s important to discuss key points and what’s important to you ahead of time to avoid possible difficulties.
Use an appropriate contract that clearly defines the scope of your project, price and payment schedule. A good contract covers important details such as, the schedule, clean-up, removal of debris – and, a written warranty.
If a contractor or sub wants a large down payment before starting the job, that could be a possible red-flag. At the end of the day, it pays to hire a reputable sub-contractor, even if it costs a little more.
If materials need to be special-ordered, it might be best for you to order the materials under your own name with the required deposit. That way, if the sub doesn’t work out, for whatever reason, you haven’t lost your deposit on special-order materials.
Here’s a checklist you might use in the process of pre-qualifying a subcontractor:
□ Ask to see a portfolio of previous work experience and jobs. Do they have a website and testimonials from previous clients?
□ Ask to examine safety records and any claims from other jobs.
□ Do they have the necessary manpower and equipment or have access to necessary equipment to scale your project?
□ Ask to see if they are licensed in the state that you will be building in. Do they carry insurance?
□ State up front what your expectations are when it comes to daily updates and accountability.
□ Ask to have a Sub-contractor 1099 Form filled out prior to beginning the project (available on the IRS website). You and your sub will also need to fill out a W-9 form when tax season comes around.
In Summary
You’re in charge! If you follow the steps mentioned, you’ll find that hiring a sub-contractor can be a seamless process that will foster a healthy relationship with subs you hire for your project.
